2005 – Start of Solar Obsession

•December 8, 2010 • 2 Comments

Although I enjoyed planetary, lunar, and deep sky objects, I started lurking in the solar forum on Cloudy Night’s Telescope Reviews in 2005. I remember wondering if I could I justify purchasing a small glass white light filter for the ETX and if it was worth spending that much to view one star.

Paul (my husband) and I eventually spent the money for a glass white light filter. We lived in town for a few years, next door to my grandmother, and the Sun ended up being a perfect target for me to enjoy. I can’t remember which of us took the first light photos of the Sun using the new filter…most likely Paul. I didn’t really understand what I was looking at, but knew that it opened up more observing time for me. NOAAs 10730, 10733, 10734, 10735 were the active regions that day. Link to Feb 12, 2005 first light.

In 2005, we attended our first star party in Bellevue, Ohio at the Sky Tour event and met up with three other members of CN for the first time. I completed my first solar sketch that weekend. I distinctly remember John Crilly telling me that one of the mistakes he often sees people make is sketching sunspots larger than they actually are. From experience, I can certainly admit it’s easy to do. I believe a factor of that is sketching in two small of a circle making it difficult to add all the details withing the active regions. Sketching larger will help eliminate the tendency to oversize the features in your sketches. Link to June 04, 2005 first solar sketch.

L-R: Scott Horstman, John Crilly, Jim Winter, Erika Rix, Paul Rix

A few months later, the five us met up again at a small star party in Michigan that involved meeting four more CN members. It’s safe to say that was the star party that truly got me hooked for solar viewing. One of the best things about star parties is meeting up with good folks that share your love of astronomy; the other is getting to test out new gear without the expense of spending money on purchases! I got my first views in h-alpha and it nearly took my breath away.

12-inch RCX with a Thousand Oaks prominence filter

There was a 12-inch RXC with a Thousand Oaks prominence filter at my disposal that John brought. One of the largest prominences I have ever seen, even to this day, proudly displayed through the eyepiece.

Gary Gibbs

Another friend, Gary Gibbs, came to this star party with an internally double-stacked 60mm h-alpha Maxscope, binoviewers, and disc mount. It felt like I was pulled through the eyepiece and was hovering over the Sun. It was amazing and left me down in the lip that all I had was a little white light filter. Little did I know at the time that I would find later how important that little filter would be for my solar observations. Unfortunately, I didn’t find a photo of him with his (now mine, thanks to Gary’s generous offer) doublestacked Maxscope 60mm. But for the sake of including a photo of one of the people that led me to my love for solar observing, here’s a photo of Gary with his Obsession.

At some stage, I became a moderator for CN for a few years, specifically in the solar and sketching forums. It was wonderful to see both take off participation wise with the increased availability in affordable h-alpha systems and more people willing to try their hand at sketching. Alas, I had no h-alpha filter of my own!

ETX70 next to the PST for both white light and h-alpha viewing.

That was soon amended with just a phone call. John graciously lent me his PST until Paul eventually bought one for me for my birthday in 2006. John’s been a wonderful friend and is not only very generous and supportive, but very knowledgeable with equipment and usually has fun toys for me to try out. It was during that time that other sketchers from the sketching forum helped me with trials and errors on sketch media and techniques to improve my solar sketching technique. After a session, I would publish my sketches, techniques, and my concerns about the sketch and we’d have an open discussion on methods/media to try next for improvement. It’s an ongoing project really as I’m constantly striving for accuracy and the best ways to record my observations through sketching true to what I visually see.

My early attempts at solar observing/sketching can be found in the following links for the year 2005…the beginning of a wild solar ride and loving every minute of it!

2005 12 08 white light report

2005 12 10 first h-alpha sketch

2005 12 12 first close up prominence sketch

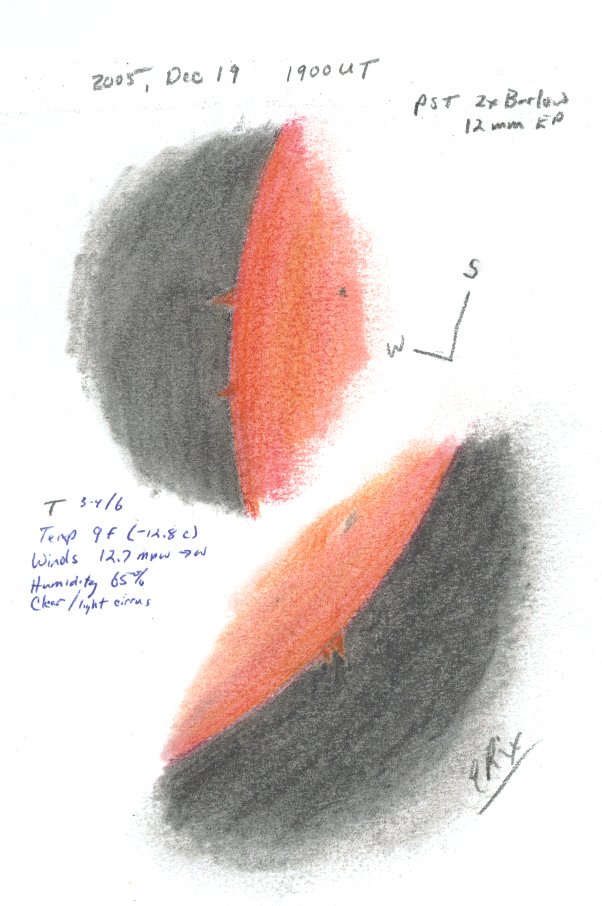
2005 12 19 solar h-alpha prominences


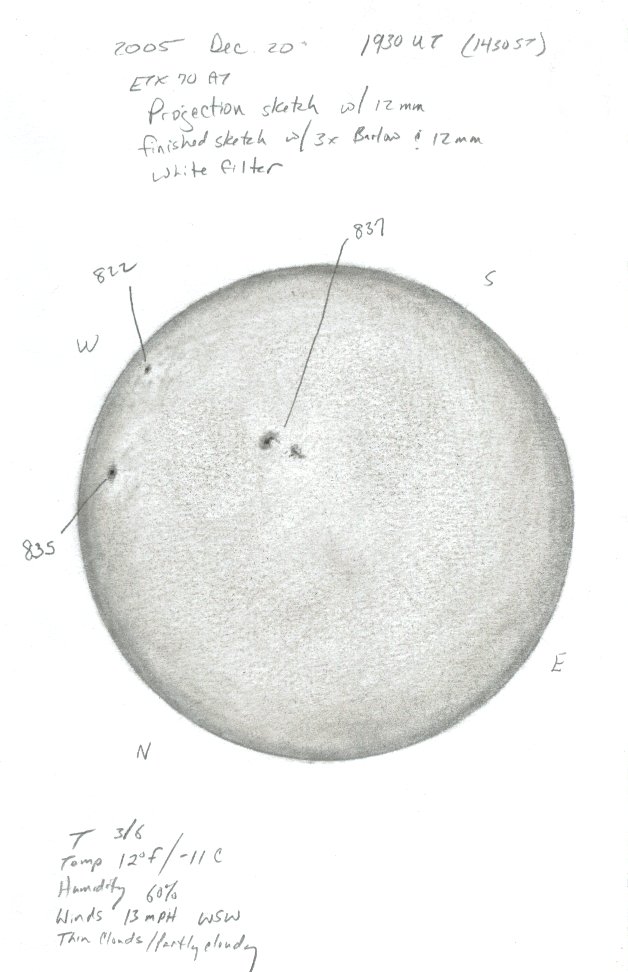
2005 12 20 First Solar Projection

2005 11 12 – Bullialdus – central peak notes

•December 4, 2010 • 1 Comment


Sketch created scopeside with Rite in the Rain paper and charcoal.

Complex craters are a magnificent sight to see, especially at higher magnifications where you can really study the terraced walls and try your best to pull detail out of their central peaks. They are formed by bolides (large meteors, sometimes exploding) impacting the lunar surface. When there is enough force from the impact, the reaction of the impact causes material to rebound back up and then fall crating terraced walls and central peaks. Have you ever seen a photograph of a drop of water as it hits a puddle? Or how about a ball that bounces in a thick patch of mud? Material is brought up from below the surface of the Moon and form the central peaks, providing insight to geological composition.

Bullialdus is one of my favorite complex craters, located in Mare Nubium. Although views along the terminator are striking, I prefer to study complex craters a full lunation before or after Bullialdus reaches the terminator. Viewing closer to the terminator, though, will provide better views of the ridges as well as secondary craters. It is ~63 km wide/3.5 km deep and is from the Eratosthenian to late Imbrian in stratigraphic age or about 3 – 3.6 billions years old. (Stratigraphy Scale)

Getting back to central peaks, spectrography from Mauna Kea Observatory revealed that the composition appear to be made of noritic material from 6 km below the lunar surface.

BULLIALDUS: STRENGTHENING THE CASE FOR LUNAR PLUTONS, by Carle’ M. Pieters:

The spectrum for Bullialdus’ central peak exhibits a strong symmetric absorption band implying the material excavated was relatively crystalline (as opposed to highly brecciated or glass-rich as is commonly observed elsewhere, such as at Apollo 16). The band center occurs near 0.93 and indicates low-Ca pyroxene is the dominant mafic component. This is the deepest material excavated at Bullialdus (from 6 km) and is of a distinctly noritic composition.

Bullialdus - LROC Wide Angle Camera View of Bullialdus crater (60 km diameter). Credit: NASA/GSFC/Arizona State University

Excerpt from NASA – Central Peak of Bullialdus Crater:

… Spectroscopic observations of Bullialdus using terrestrial telescopes showed that Bullialdus is compositionally distinct from the surrounding region. Later studies using Clementine multispectral data indicated that there are several rock types exposed on the floor of the crater. Lunar scientists who have studied Bullialdus proposed that the impact excavated mafic materials from great depth…

Amateur astronomer, Rick Evans, has been doing some very interesting geologic studies of the Moon involving photoclinometry, spectroscopy, and multispectral imaging. This link highlights Bullialdus and spectral maps of lunar topography using Octave. Rick Evans’ Amateur Lunar Photoclinometry, Spectroscopy, and Astrophotography

Observation sketch by Erika Rix 2005


References:
Rukl map: 53 Bullialdus
Virtual Moon Atlas
The Modern Moon: A Personal View, by Chuck Wood, pgs 148-149
BULLIALDUS: STRENGTHENING THE CASE FOR LUNAR PLUTONS, by Carl6 M. Pieters

2005 05 17 – Bullialdus and Rupes Recta

•December 3, 2010 • Leave a Comment

I kind of cringe reading some of my past reports. But they were the foundations of my learning curve for astronomy. We had moved in town to be closer to my elderly grandmother, Polly (to me, she was Nanny…and whom our observatory is partly named after). The constellations were barely visible in town and as you can imagine, star hoping was nearly impossible. To a novice, it took sheer determination and desire to learn more about the wonders of the night skies to attempt hunting for DSOs without proper alignment of a Goto scope. Because of this, the Moon was my favorite target…and the enthusiasm certainly showed.

17th May Night Out….Finally!

Let’s see, it was 21st April since my last session at the scope….I suppose that’s not entirely considered eons ago, but it sure felt like it. We set up both scopes….and although I’m sure it was my turn on the big fella, Paul wanted to image rocket bodies. He bought me an observing chair (like yours, Preston), so who was I to argue about the scope tonight?

Glancing at Plato, I was unable to see craterlets at 131x magnification on the ETX70. I was struggling to remember Tim’s suggestion at best viewing times for this, but I did recall lower magnification advice.

Somewhat disappointed, I thought….Matt had pointed out domes and I must get to that! But I wasn’t able to find them quickly in the velveteen Rukl, and I wasn’t in a fiddly mood, lest I waste precious time. So I let the slewing begin, soaking up the bright surface of the moon. It was almost like the warmth of the sun on my face after several days of rain and overcast. I truly needed this night of viewing, although it is now 20 till 2am and I will surly suffer for it tomorrow morning.

Bullialdus (along with A & B) were first to catch my eye. Keeping the 131 mags, the detail was not great because of a washboard effect from turbulent air. I chuckled to myself thinking of Carol and her magnificent sketches, and purposely defocusing her views. Here was my chance to try the same method, only without my consent….well you can see the sketch for yourself…definitely not a piece of art, but at least I can tell what it is. The shadows filled the entire crater except for the inside wall on the Western side. I’m sorry I omitted the directions on my sketch. West will be to the right, North at the top. That’s Konig partially in view at the lower right.

Bullialdus is approx. 63km wide but the height is around 10,600 feet. The central mountain was not visible due to the shadow, and really, I can’t recall seeing rays either with the ETX, however, when Paul was done with the big fella, I took a peak with that scope using just the 8mm Plossl and saw a detailed inner wall on the West as well as beautiful ridges running up the Eastern outer side. The vivid texture between the four craters in the sketch was amazing. Alas, my sketch was already done and no matter what I tried to add to it later, it just messed it up more.

By this time Paul was done with the big fella, so I had a quick peak at Plato again, and low and behold, you’ll never guess what I saw!….well ok, so you guessed. But I only saw one for sure, maybe two craterlets in Plato. I was well pleased and will look again at another date.

I’ve decided to start a collection of Lunar 100 sketches or images as well (this will not include Paul’s images), so although I’ve logged several objects off Chuck Wood’s list already, I’m going to begin again so I can include the sketches. Rupes Recta was the feature, but also included were Birt and his Rille.

Rupes Recta (Straight Wall) is close to 117km long, but only around 900 feet high and is said in Rukl to be the most remarkable fault on the moon. As remarkable as it was, that little Rima Birt was a cutie lying boldly beside the huge fault. This was my favorite part of the night as that area was so smooth with the odd detail here and there, it appeared to be lulling me to peaceful slumber.

After the umpteenth skeeter bite, visions of ticks crawling up my legs, and tiredness, I decided to pack it up and move it in….but not before opening up my new Messier marathon field guide. It seems I was a bit of entertainment for Paul…to orientate myself to find the constellations, I had to lay back across his car with the book pointed towards the sky in front of me, turned upside down. It’s hard to concentrate when you have someone laughing at you!

2005 rendering of Rupes Recta

Click here to read the 2010 Oct 17 report of Rupes Recta.

2010 06 08 – NGC 6207/H 2. 701

•December 2, 2010 • Leave a Comment

2010 June 8, 0330 UT
PCW Memorial Observatory, Zanesville, Ohio USA – Erika Rix
16” Zhumell, 8mm TeleVue Plossl, magnification ~225x
Temp: 10C, Humidity 74%
Seeing: P 7, Transparency: 3/6

NGC 6207, H701, UGC 10521 Galaxy type SA(s)c III
Lens-shaped spiral in Hercules just 28’ NNE of M13
RA 16:43.1, Dec +36:50, Her “400”
Stellar nucleus, 3.0’ x 1.1’, magnitude 11.6v

click on image for larger view

Sketch created scopeside with Rite in the Rain paper, black ballpoint ink pen, #2 pencil then the stars cleaned up in Photoshop and inverted with adjustment to brightness and contrast.


(As written from my notes on June 8th, 2010):

The light pollution was terrible tonight. The sky above a local factory lit up like a bright dome. Seems to be worse this year and I was forced to put up the southern drop down wall of the observatory to block out the excess light.

Nevertheless, it was a very enjoyable night under the stars and the Milky Way was still visible. M13, ol’ faithful, was the first to be viewed. I started off with a 13mm Ethos and then dropped down to an 8mm TV Plossl. The number of individual stars in the globular cluster that popped out was amazing.

Switching back to the 13mm, I pushed the scope across slightly to NGC 6207, and then switched back to the 8mm again for a closer look. NGC 6207 is located ~ 1/2 degree NE of M13.

Screenshot from "The Sky", Version 5

The nucleus was stellar, but I was unable to really pinpoint exactly where the brightest area was. I had to view with averted vision and believe I have it placed fairly accurately.

According to The Night Sky Observers Guide, Volume 2, using 12″-14″ scopes @ 125x:

…NGC 6207 is enclosed in a triangle of 12th magnitude stars. Its fairly bright 2′ x 0.75′ NE-SSE halo has tapered ends and contains a stellar nucleus.

The tapered ends were allusive…in fact, they were diffuse and seemed to dissolve as they extended outward. For a closer look, please check out the link NGC 6207 from The NGC/IC Project by Robert E. Erdmann, Jr.

For additional reading, Tom Trusock’s Small Wonders: Hercules (7/09) article found on Cloudy Nights Telescope Reviews is an excellent guide for the constellation Hercules.

References:

The Night Sky Observer’s Guide, Vol. 2, by Kepple and Sanner, pg. 198
www.cloudynights.com
Best of AOP
Ole’s Astronomy Site – Supernovae
William Herschel’s Deep Sky Catalog

H-alpha Full Solar Disk Sketching

•November 27, 2010 • 4 Comments

As we transition out of the solar minimum and into the solar maximum, it’s a great time to try your hand at sketching the full solar disk. As if sketching prominences weren’t tricky enough, or even just sketching sunspots using a white light filter, sketching the entire Sun in hydrogen alpha means rendering additional features such as filaments, plage, active regions, and possible flare activity.  Creating the mottled appearance of the “surface”  itself can be very challenging. If you take it one step at a time, it won’t be as overwhelming as first believed.  Hopefully this tutorial will help you along the way.

H-alpha Full Solar Disk

Observing Tips:

  • Remember that solar observing is affected by the same conditions that night-time observing is: the Sun beating down on pavement or wood decks creating quivering views, winds, eyepieces fogging up from your breath in the colder months/sweat from your eyebrows in the hotter months, even dark adaption (yes…having your eyes adjust to the darker views of hydrogen alpha so that you can see the faintest of details in prominence structure). Pick your location wisely to give you the best views for that day’s weather conditions.


  • Your eyes can detect movement sometimes easier than they can the fainter details. Some filters don’t have a flat bandwidth nor a flat field of view. Different solar features have slightly different optimal bandwidths. So…have a play with those knobs to get the most out of your session. Scan back and forth slowly, move the FOV around, notice the features popping in and out of bandwidth.


  • Outside light around the eyepiece cups will prevent you from seeing the fainter details. Eye cups, towels, proper solar cloths, or even a cardboard solar shield, will help.


Sketching Tips:

  • Use grid lines or triangles to assist you for proper placements of features. Also, the larger your circle, the easier it is to fit in all the details…which in turn will keep the “super-size” temptation at bay.


  • The types of paper and pencils you use can hinder or help you. Things to consider: sunlight glare on your paper will temporarily give you blind spots when you try to observe again after adding a marking (worse with white paper – think dark adaption when you put your eyes back to the eyepieces), texture, smudges or holds the pencil markings, colors…


Sketching Tutorial:

  • Draw a large circle with your compass. Fill it in with the flat of your Conte’ crayon.


  • Blend with clean, dry fingertips. I’ve tried chamois, brushes, blending stumps, and a variety of other blending tools for this step. Each one removed too much of the Conte’. The combination of the Strathmore Artagain paper’s tooth and a light blending of my fingertips produced the most accurate representation of mottling.


  • If you go outside the lines, use a flattened eraser tip to cleanly remove the stray markings.  I use a utility knife to flatten the eraser tip to resemble a flat-head screwdriver.


  • Draw the prominences around the limb. Use a sharpened Conte’ pencil for the brightest areas and the white watercolor pencil for the fainter ones.


  • Add sunspots with a black wax pencil or charcoal. I use the sunspots and prominences as anchors to assist with proper placements of all the other features.


  • Plage is added with the Conte’ pencil. Really study the active regions and be specific with your markings, placing each stroke as accurately as you can. Again, don’t be afraid to adjust the tuning of your scope to tease out details.


  • Add dark contrast and filaments with a combination of charcoal and the black wax pencil. The charcoal will be more subtle and the wax/oil will be more dramatic.


  • Continue working, making your way in sections across the entire disk. Scan thoroughly once again, making minor adjustments to the tuning to ensure you don’t miss out details.


  • To finish it off, I scan my sketch or take a photograph of it, adjust the brightness/contrast to match the true appearance of my sketch, and then I insert a graphic from the Tilting Sun program that shows the orientation for my scope and mount (dependent on how my diagonal is turned and where I am sat behind the eyepiece) and any useful information concerning my observation.

2010 11 20 Lunar Aureole

•November 20, 2010 • Leave a Comment

I love this time of the year when sun dogs and lunar aureoles are in abundance. Explanation of Lunar Aureoles

Light is diffracted by tiny droplets of water in the atmosphere creating these beautiful scenes. The droplet size, shape, and light wavelength all determine the outcome of the corona. The smaller the water droplets in the atmosphere, the larger the diameter of the ring around the Moon or the Sun.

Remember to look up!

2010 10 21, Kepler’s Rays

•November 18, 2010 • 2 Comments

2010 10 21, 0545UT Kepler’s Rays
PCW Memorial Observatory, OH, USA, Erika Rix
Zhumell 16”, 8mm TV Plossl, 225x mag, no filter
Temp: 12°C, 42% humidity, S: Antoniadi III, T: 2/6
Sketch created scopeside with Rite in the Rain paper and charcoal.

Phase: 31.4°
Lunation: 12.46d
Illumination: 92.7%
Lib. Lat: -6°08’
Lib. Long: -1°16’
Az: 234°24’, Alt: 37°25’

Kepler’s Rays: Ray system stemming from Kepler, 38°W, 8.1°N
Copernician period (-1.1 billion yrs to present day)

Click thumbnail for labels

As I sit here at the kitchen table eating lemon drop cookies and drinking my coffee, I’m trying to concentrate on the reading material in front of me that discusses lunar rays on the Moon. First of all, it’s hard to concentrate while the two young dogs in the family are playing beside me; and secondly, I don’t have my reading glasses on, making concentration even harder. But I think what’s really getting to me is that the more I read, the more questions I have regarding rays.

Simply put, rays are streaks of ejecta that spray outward during the formation of impact craters. The larger pieces of ejecta can form smaller impact craters in the process. Rays may appear bright because of the abledo and/or thermal properties of the ejecta material differing from the surface material.

Lunar rays can assist (though not always) in comparing ages of features or other impact craters because of layering. Over time, space weather will erode or change the albedo of the materials, iron oxide may be more abundant in certain areas that may preserve the brightness of the rays making them appear newer, or other impact craters or lava flows may have destroyed them.

Sketching rays was not an easy task for me. I found it much more enjoyable to sketch all the craters in the area. My tips to anyone wishing to use white paper instead of black: draw in your craters first so that you have anchors for ray placements, concentrate solely on the dark areas, work in layers – light to dark, work in wedges around the origin crater, and finally…patience is the key. The craters are the easiest part of the sketch!

Resources:
Rukl plate: 30 Kepler
“A Photometric Investigation of the Lunar Crater Rays” by J. Van Diggelen
“Correlations Between Iron Abundances and Lunar Surface Features: Crater Kepler Area” by Lu Yangxiaoyi
“The Modern Moon” by C. Wood pg. 172 (mention of Kepler’s Rays), pg. 51 (Bright Rays)
Lunar Orbiter photos of Kepler
The Moon(LPOD) – Kepler

Lunar Sketching with a Dobsonian

•October 21, 2010 • Leave a Comment

While discussing sketching techniques on the Cloudy Nights sketching forum , I thought it might be helpful to post my response here as well concerning my technique for sketching Rupes Recta recently.

Use of charcoal:

I really like the dynamics of charcoal and also how flat it is. Graphite appears shiny to me while sketching and is harder for me to see some of the finer details on the sketch when I need to add more markings.

Sketching with a Dobsonian mount without tracking:

My Zhumell is three strut dob without a tracking platform. I was very spoiled with the LX200 when it came to lunar observing. My husband mainly uses the LX200 now (or the ED 80 piggybacked on the LX200) for his imaging so I’ve adjusted to the constant pushing and nudging of the dob for those long lunar sessions. I think it takes me longer to constantly nudge the scope than it does for me to actually sketch the target…lol. I’ve gotten pretty good about nudging it with my forehead, side of my face, shoulder, nose, back of my sketching hand…

I find it helpful to use eyepieces with a wider field of view when using the dob. It gives me more time between nudges, although still only have time for a few markings on the sketch pad before I have to nudge it again. I sometimes will use lower magnification for the albedo features and then increase for the finer details within the craters, etc.

If I feel pressed for time, such as clouds coming in or the moon getting close to the treeline, my sketches really suffer. I find it much easier when I know I can allow several hours to relax, study the target, and sketch knowing I have no time constraints. I also have an adjustable chair that I scoot along during the duration of the session.

Sketching sequence for Rupes Recta:

As for the sketching itself, I draw the anchors first; ie, in this sketch I drew a faint marking for the scarp and the “scoop” so that I could add Birt in the proper place as well as its proportion. Then I added the background of lunar surface; next came the finer details of the main features: craters, scarp, allusive ridges around Thebit; and lastly the albedo markings.

Persistence is the key, I think. Almost every lunar sketch, and sometimes solar as well, I come to a point where I think the sketch is getting worse instead of better and it’s tempting for me to want to start over. But then if I keep at it, it falls into place at the end.

2010 10 17 – Rupes Recta

•October 17, 2010 • 1 Comment

2010 10 16, 2351 UT – 2010 10 17, 0142 UT Rupes Recta
PCW Memorial Observatory, OH, USA, Erika Rix
Zhumell 16”, 20mm TV, 3x Barlow, 270x mag, 13% T moon filter
Temp: 7°C, 59% humidity, S: Antoniadi II, T: 2.5/6
Sketch created scopeside with Rite in the Rain paper and charcoal.

Phase: 65.2°
Lunation: 9.33d
Illumination: 70.9%
Lib. Lat: -3°50’
Lib. Long: +2°56’
Az: 209°37’, Alt: 32°06’

Rupes Recta: Scarp, 7.7° W, 22°S
Imbrian period (-3.8 billion yrs to –3.2 billion yrs)
Length: ~110 km, Height: 240-300 m, Apparent Width: 2.5 km

Located in Mare Nubium, this scarp, also known as the Straight Wall, was apparent by the shadow cast from illumination from the east. The shadow wasn’t very wide, but rather narrow and smudging to the west. The eastern side of it was crisp and sharp. During the waning phase, this same feature would appear as a white line from the illumination coming from the west. The slope incline is ~30-40° (ref. Virtual Moon Atlas). For a good comparison between the waning and waxing phases for this feature, please have a look at this site: Illumination comparison; Astrosurf.com

Lightened areas around Birt (Copernician period) made a path from the crater to the fault, showing off Birt A as well as a “V” shaped area nestled between Birt and the companion craters K, J, and H (you will have to look at an atlas for those craters as I wasn’t able to see them during my observation last night).

The ridges to the south of Rupes Recta formed what I always pictured as a scoop, make the ridge and the fault look like a ladle. Funny that a woman should think of it a ladle whereas 17th century selenographer Christiaan Huygens reckoned it looked more like a sword (ref. Modern Moon, page 147). A lightened area to the south (top of the scarp in my sketch from last night) outlined the circular ridge of Thebit S. It’s a pity it wasn’t more defined during my observation. What I found very interesting to observe was the darkened cirlce that Rupes Recta and the wrinkle ridges to the west formed. I believe the ridges to the east outline the ancient crater that Chuck Wood dubbed Ancient Thebit in the Modern Moon.

Rima Birt looked more like a thin shadow than a rille. Looking back to a sketch I rendered in 2005 using an LX200 Classic, not only was this rille visible, but I also caught Birt E, which I didn’t see during last night’s observation.

2005 rendering of Rupes Recta

Resources:
Rukl plate: 54 Birt
“The Modern Moon” by C. Wood pg. 146-147
Lunar Orbiter: Rupes Recta

2010 10 10 – Comet 103P/Hartley

•October 10, 2010 • 4 Comments


2010 10 10, 0441UT-0537UT – Comet 103P/Hartley
PCW Memorial Observatory, Zanesville, Ohio, USA, Erika Rix

Sketch Media:
Copy paper, template courtesy of Perez Media, 0.5mm mechanical pencil, #2 pencil, blending stump, ultra fine black permanent marker

The timing was perfect: I worked evening shift, came home to an open observatory (compliments of Paul who was imaging Jupiter on his side of the observatory), grabbed the location of the comet from Starmap HD, changed into my slippers and sweats, and headed down to the observatory. Paul helped me move the Zhumell to the southwestern side of the observatory so I could get a good view or Perseus and Cassiopeia over the trees and left me so that I could observe without the lights from his imaging gear.

This was my first observing session without Riser sleeping on his blankets next to me. A few weeks ago, just months after we celebrated his 14th birthday with a trip to the local dairy freeze for an ice cream cone, we heartbreakingly had to say our goodbyes and put him to rest in our little pet cemetery. I imagine Buttercup and Freckles will assume his spot in the observatory as my observing buddies, but Riser is, and will continue to be, surely missed.

Comet Hartley was near binary star system SAO 23655 (15n-Per):
Constellation – Perseus
System Name – Eta Persei / Miram


SAO 23655 had a glow around it resembling nebulosity. 103P had perhaps a very slight hint of a tail in the fact that the nucleus appeared slightly elongated. The nucleus was dense and smoothly blended with the surrounding coma. The coma was large and gradually faded out against the darkness of the background. I failed to render the fading properly in my sketch. In reality, I couldn’t exactly discern where the coma ended.

Toward the end of the sketch, I noticed that the star placements I had jotted on the paper weren’t very accurate with the position of the comet. It was at that time that I noticed just how much the comet had traveled and I decided it would be best to end the sketch.

For more reports on 103P, the members of Cloudy Nights Telescope Reviews have a thread to share their observations:
Cloudy Nights Comet 103P Discussion Thread

Additional helpful links:

ssd.jpl.nasa.gov

By Jonathan Shanklin, BAA, Comet Section: www.ast.cam.ac.uk

Comet 103/p Hartley
(visible as green ball) and the Double Cluster in Perseus, as seen 09 OCT 2010 from Mt Laguna. Paul Martinez and Philip Brents. Canon 30D and 70-200 f/2.8 atop Meade LX-75, stack of two images at 1600 and 3200 ISO, 30 sec f/2.8. Free license under CCSA 3.0 (see vcastro.com/fal).

General information regarding comets: en.wikipedia.org/wiki/Comet